Electronic
Projects Online - Intercom
Originally published
by Paul Stenning in Electronics in Action, April 1994
I needed a simple
intercom system, so that I could keep in touch with civilisation when
I was hiding in my workshop! My partner was getting rather fed up
of making journeys just to ask me if I wanted a cup of tea, or to tell
me that the editor of an electronics magazine was on the phone!
 For
this application a separate "call" function is not necessary. Instead
I opted for a short tone when the talk button was pressed. This
is to get the other person's attention, rather like the "bing" sound on
the announcement systems in public places. I was originally hoping
for a "peep" sound, although it ended up more like a "pweee"!
For
this application a separate "call" function is not necessary. Instead
I opted for a short tone when the talk button was pressed. This
is to get the other person's attention, rather like the "bing" sound on
the announcement systems in public places. I was originally hoping
for a "peep" sound, although it ended up more like a "pweee"!
There is a talk
button at each end, so it's impossible to eavesdrop on the other party
- unlike some cheap commercial systems. However if the remote talk
button is replaced with a normal switch, it can be left on so that the
system may be used as a baby monitor.
I already had a twelve-core cable between the workshop and the living
room, carrying audio from the hi-fi, serial computer data and a telephone
extension. There were just two cores left, hence this design for
a two-wire system. Any convenient two core cable can be used, thin
loudspeaker cable is ideal.
What - No Chips!
I built this unit using bits from the "Junk Box", and assumed others
might like to do the same. If you don't have the right chips, there's
no option but to buy them. However if you don't have the right transistors,
you can usually find something similar, and the same applies with most
of the other components. Since the circuit doesn't have to do anything
exacting, a simple transistor design is ideal.
There is sufficient gain in the system that a person can be heard clearly
when talking at a normal volume, about two feet from the unit. Since
the person speaking would be pressing the talk button, this is the maximum
distance necessary.
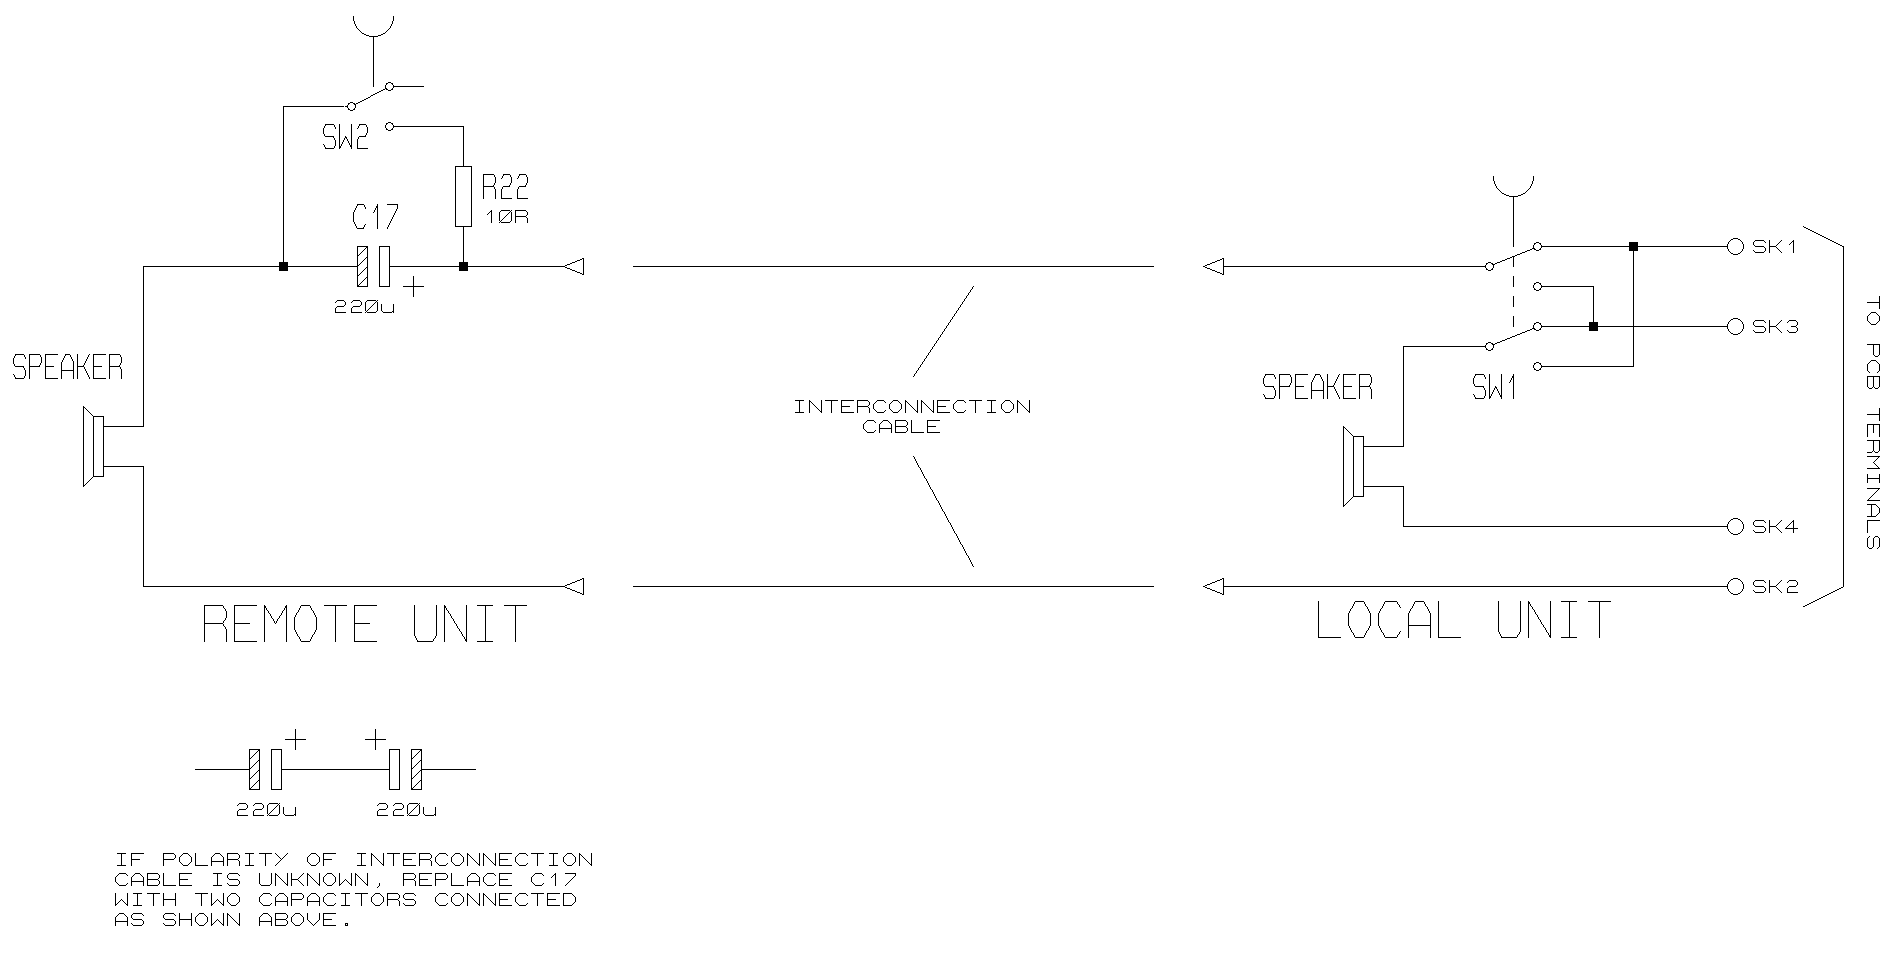
The Works
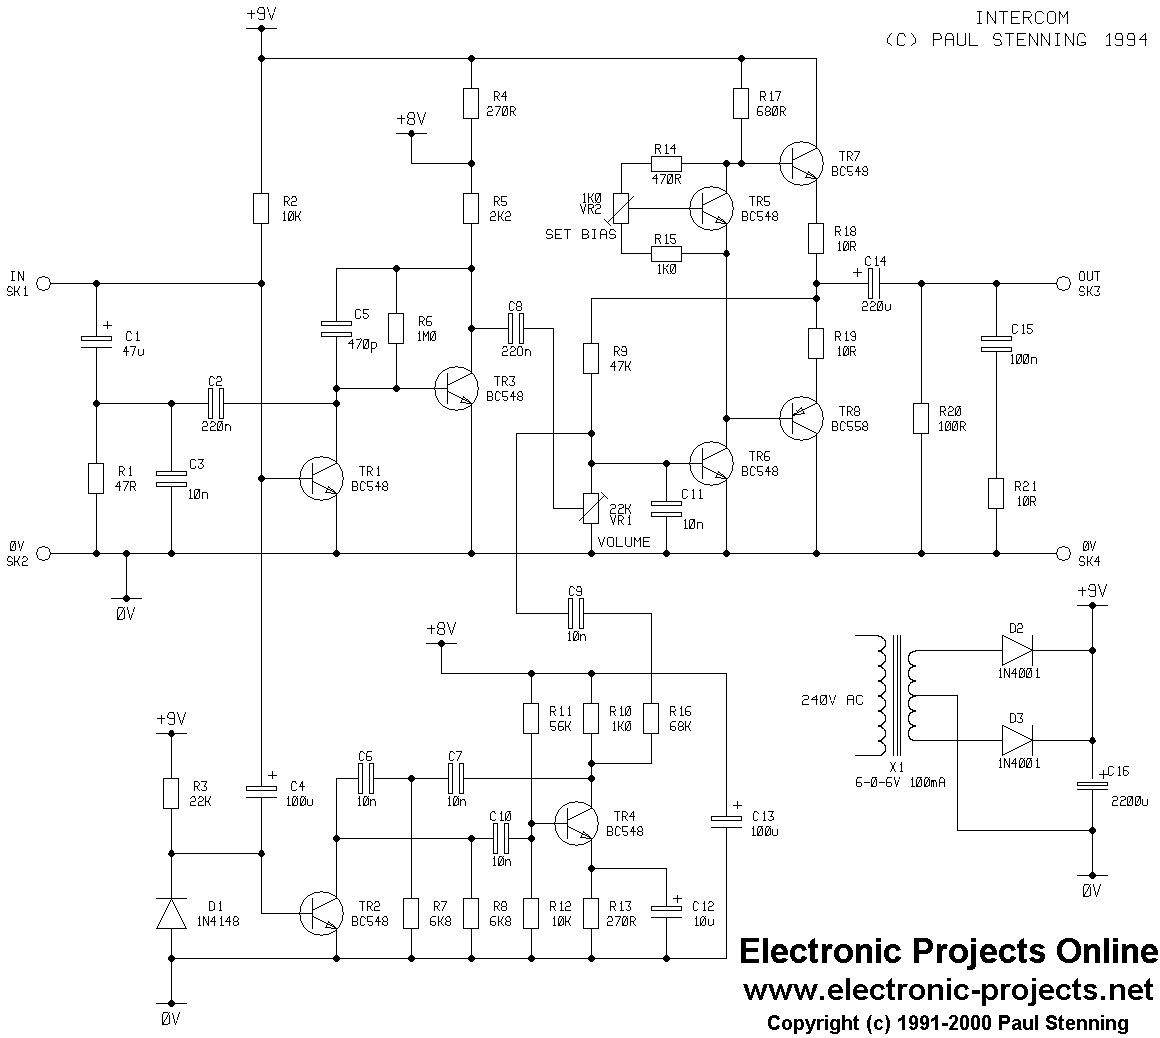
Figure ** is the main circuit diagram, and shows the components mounted
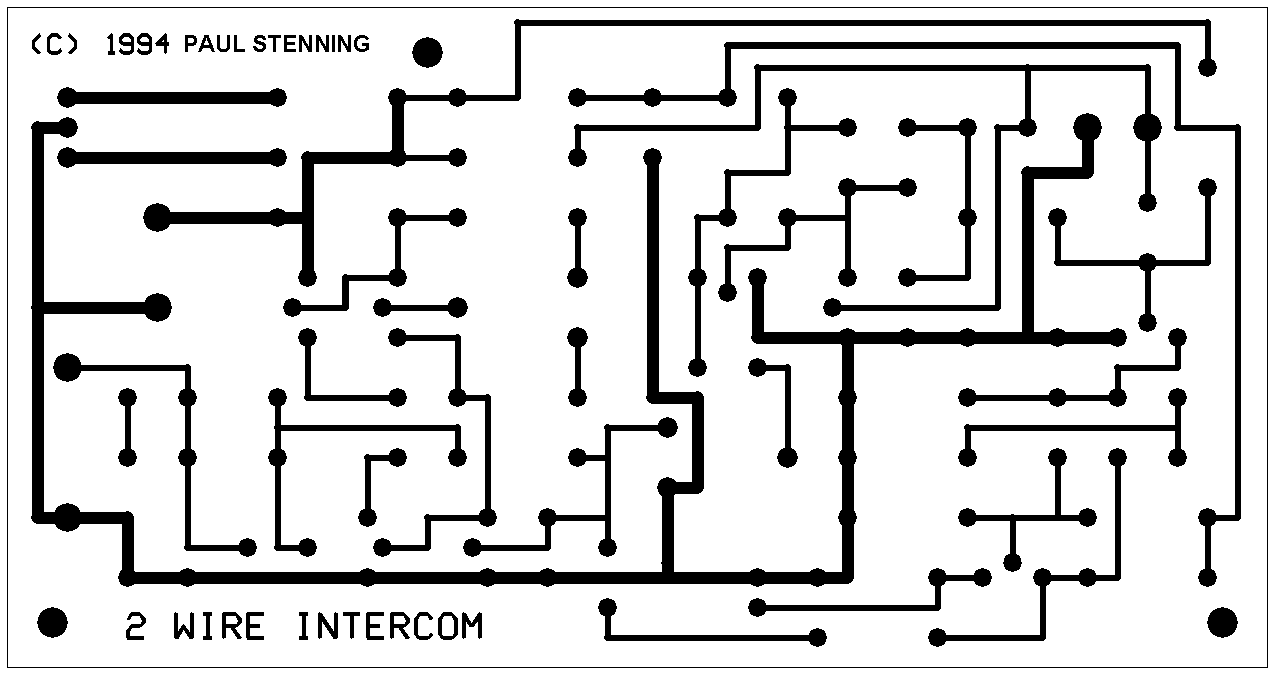
on the PCB. Figure ** is the interwiring diagram, which shows the
switching arrangement and loudspeakers.
The requirement for a talk switch at each end on a two-wire system complicated
the design slightly. Capacitor C17 is connected in series with the
remote speaker, and is short-circuited when the talk switch is pressed
(R22 limits the discharge current). The electronics at the local
end detects the DC path when the switch is pressed.
TR3 and the associated components form the first audio amplifier stage.
When a low resistance DC path is present between SK1 and SK2, TR1 will
switch off, allowing TR3 to be biased by R6. The audio signal is
coupled to the base of TR3 by C1 and C2.
R1 reduces the input impedance to reduce the chance of noise pickup along
the long connecting lead. C3 and C5 remove any RF interference that
may be present and limit the top end of the frequency response to about
4KHz. The low values of C2 and C8 limit the lower end of the frequency
range to about 200Hz. This frequency response is adequate for speech,
and allows a high gain to be achieved with minimal problems due to hum
and noise.
Since TR3 is biased off when the unit is not in use, the gain is low and
no hum or noise can be heard.
TR5 to TR8 and surrounding components form a basic class B audio output
stage, with a power output of about 200mW RMS into 8R. VR2 is adjusted
to give a quiescent current of 2mA, to minimise crossover distortion.
Preset VR1 sets the audio gain. In use this will probably be set
to maximum, although it is useful to be able to reduce this when testing
to avoid feedback.
TR4 and surrounding components form a standard RC phase shift oscillator.
The output of this is fed into the power amplifier via R16 and C9.
TR2 has been added to short out the signal at one of the phase shift points,
disabling the oscillator. This transistor is normally held on by
R3, however when one of the talk buttons is pressed it is turned off for
about half a second. This time is set by the values of R3 and C4.
Thus the oscillator produces a brief tone when a talk button is pressed.
The circuit is mains powered using a small six volt transformer.
Since the current requirement when the unit is silent is minimal, a 100mA
transformer is adequate. The supply to TR3 and TR4 is additionally
decoupled by R4 and C13.
Construction
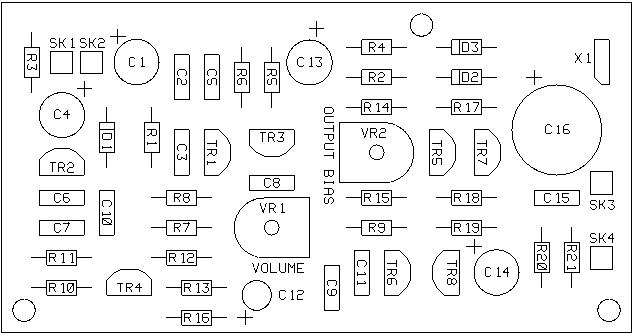
The circuit is assembled on a single sided PCB. Assembly is
straightforward and should present no difficulties. None of the
component values are critical, there should be no problems using the value
above or below if the correct part is not available. If you are
using different transistors, ensure that TR7 and TR8 have a maximum collector
current rating of at least 100mA.
 Ceramic
disk capacitors can be microphonic and are not recommended for C2, C3
and C5. The oscillator phase shift capacitors, C6, C7 and C10, should
have a good Q rating or the circuit may fail to oscillate. Ceramic
disk and dipped polyester types are fine, but the small resistor sized
tubular devices are not suitable.
Ceramic
disk capacitors can be microphonic and are not recommended for C2, C3
and C5. The oscillator phase shift capacitors, C6, C7 and C10, should
have a good Q rating or the circuit may fail to oscillate. Ceramic
disk and dipped polyester types are fine, but the small resistor sized
tubular devices are not suitable.
The PCB should be mounted in a suitable enclosure, together with a loudspeaker.
A similar box will be needed for the remote unit. The prototype
system was built into a pair of small stereo loudspeaker cases, containing
16R oval speakers. These are readily available at car boot sales
for a few pounds, complete with a matching defunct stereo record player!
Suitable holes should be made on the top surfaces of both case, for the
push button switches. The PCB and transformer can be mounted in
any convenient position, in one unit. A suitable connector should
be fitted on the rear of each unit for the interconnection cable.
If the installation will be reasonably permanent, electrical choc-block
connectors will suffice.
The units should then be wired up as shown in figure **. If the
interconnection cable does not have polarity markings there is a 50% chance
that C17 will be the wrong way round! In this case fit two 220uF
capacitors in series but opposite ways round as shown.
Testing
Initially set VR1 to the centre position and VR2 fully anticlockwise.
Connect the two units together and connect the master unit to the mains.
Connect a voltmeter across R18 or R19 and adjust VR2 to obtain a reading
of 20mV. This gives a quiescent current of 2mA, which is sufficient
to eliminate crossover distortion with 16R speakers. With 8R speakers
it may be necessary to increase this to 3 or 4mA (30 or 40mV), this should
only be done if distortion is noticeable.
Both speakers should now be silent. Press the talk button on the
remote unit. A brief tone should be heard from the local unit, and
you should then be able to hear yourself speaking through the system.
Check this the other way too. VR1 should be set so that speech is
loud enough to be clear without being deafening. This setting can
only be finalised once the units are installed, since feedback will be
a problem with both units in the same room.
If the volume of the bleep is too loud (unlikely), it can be reduced by
increasing the value of R16
In Use
What can I say - push the button to talk and release it to listen.
If both buttons are pressed simultaneously, the master unit will dominate.
The units will pop and click as the buttons are pressed and released,
this is due to the varying bias on TR3. In practice it is useful
to be able to hear when the other party has released the button.
You can now keep in touch with your loved one, and enjoy your hobby.
However, there is one problem with such a useful communication system
installed - it is much easier for your partner to nag you about how much
time you spend in the workshop! Make sure you have the master unit,
then you can always "accidentally" unplug it!
Parts
Resistors (0.25W 5% or
better)
R1
47R
R2,12
10K
R3
22K
R4,13
270R
R5
2K2
R6
1M0
R7,8
6K8
R9
47K
R10,15
1K0
R11
56K
R14
470R
R16
68K
R17
680R
R18,19,21,22
10R
R20
100R
VR1
22K Horiz Preset
VR2
1K0 Horiz Preset
Capacitors
C1
47u 10V
C2,8
220n
C3,6,7,9,10,11
10n
C4,13
100u 10V
C5
470p
C12
10u 10V
C14,17
220u 10V
C15
100n
C16
2200u 10V
Semiconductors
TR1,2,3,4,5,6,7
BC548
TR8
BC558
D1
1N4148
D2,3
1N4001
Miscellaneous
X1
6-0-6V 100mA Transformer
SW1,2
DPDT Push Switch
PCB, Two Loudspeakers (8 or 16R), Two Cases, Two Connectors and Thin 2
Core Flex for Interconnection, Mains Flex